I like so much to make works onto painted silk. In this way I can create very beautiful backgrounds for my pictures. I have already made some works in this mix technique:


Of course all these works need many time but you may use the mix method for making small pictures and cards. These works looks nicely too. Now I want to tell you about very easy method to make greeting card using silk painted. And you can do it together with children.
We need following materials and tools:
- Blank card or thick paper
- A piece of silk fabric ( a little smaller than card ready). I took genuine silk but some white thin sinthetical fabric is matched too.
- Palette with hollows or some small cups for liquid paints
- Paints. You need the liquid paints for silk (e.g. Marabu silk, Javana by Kreul) or paints for any fibers (e.g. Setasilk, Setacolor by Pebeo, Dye-na-flow by Jacquard), that based on acryl. You do not need a lot of colors – I used only yellow, red (scarlet) and blue.
- Wood frame of fitting size (depending on the size of piece you are painting) and push pins for stretching your fabric (optional)
- Hole punch Maple Leaf 3/8"
- Red maple leaves ( or other flexible leaves that aren't breaking by the punch) and some small ones (pressed)
- PVA glue
- Spray glue (optional)
- Brushes for glue and paints (soft)
- Leaf stamp (optional)
- Paper decorative ribbon ( you can make it with edging craft scissors)
- Scissors
- Greeting stickers (optional)
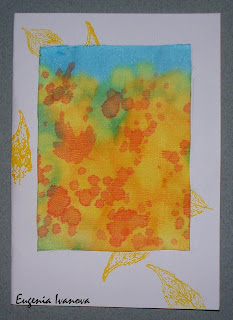
- Mark picture's area onto the cardstok with a pencil. If you want to decorate the card with leaf stamp, do this using stamp pad (or spreading acryl paint over the stamp) as follows
2. Now pre-wash your fabric by hands with
warm water and soft washing powder. Rinse and while the fabric is damp, stretch it onto wood frame.
If you want to dispense with the frame, merely put fabric piece onto paper towel.
3. Do paints of colors needed by watering them just in the palette. Mix yellow and a bit of red to get orange color needed. The colors should not be too bright. If the fabric is dry already, wet it entirely with the brush or a sprey. Now dip your brush into yellow and then into blue colors and apply the paint by
touching the brush to the fabric. Allow color spots to diffuse and mix onto the fabric.
Then I have slightly dried the silk
with a fan after painting so that my color spots do not spread completely.
4. The fabric is dry. Dip the brush into orange paint and apply small spots with tip of the brush. If you want to paint a leaf, the brush with orange color must be almost dry. Otherwise the outline of the leaf will flow and get out of its shape.
Let the fabric dry.
5. Take off painted piece and cut out the rectangle of needed size. Attach it onto your card with spray glue. If you don't have spray, glue fabric rectangle along edges by stretching it slightly.
6. Make several "maple leaves" with craft hole punch.
7. Attach all leaves onto your card with glue and mask fabric's edges by pasting the decorative ribbon atop. Now you can cover the leaves with botanical glue (or PVA glue watered 1:1) to protect them since the glue layer forms transparent film after drying.
8. Decorate the card with greeting stickers. Also you can make the stickers by yourself - just print some pictures onto self-adhesive paper or film and then cut out them:
Your card is finished!
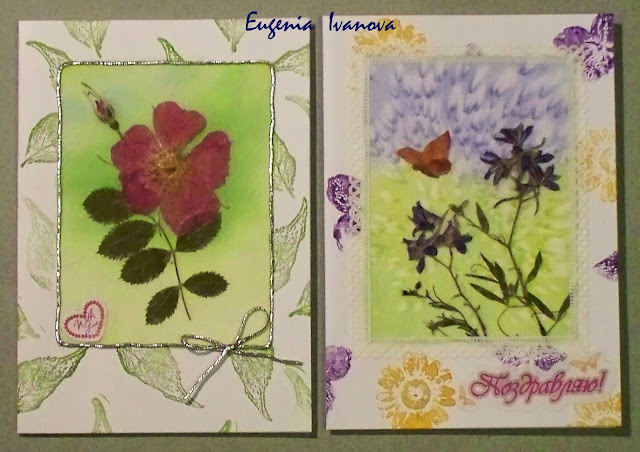
Here are similar cards in the same technique:
They are simple too. Here I have covered the painted silk and plants with transparent tengucho paper to protect pressed flowers and leaves. Then I smeared all details with botanical glue over the paper to conserve bright color of the plants. I think it is possible to use some transparent fabric too.
Here is a little more difficult painting. I used special resist to depict the blebs.
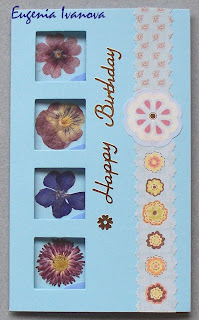
There are blank cards with various windows. You can put the painted fabric in the window:
This is without any fabric but with square windows
These flowers are between layers of tengucho paper in figured window:
Here is important point in the working with those windows. You should stretch the inserting piece when you glue it along the edges.
Next time I will share some other ideas for cardmaking with pressed plants.
Thank you for your attention!